Coffee brewing accessories can significantly enhance and simplify the process of making this exceptional drink. The right equipment helps you bring out the full flavor and aroma, while improving repeatability and control over the brewing process. Some tools are essential for every coffee enthusiast (e.g., a grinder or a scale), while others are impressive add-ons that expand your possibilities (e.g., an elegant Chemex or a precise thermometer). We’ve put together an overview of key coffee accessories—their definitions, use cases, and tips on when and why they’re worth using. You’ll also find links to JAVA Coffee Roasters products, references to helpful blog articles, and an FAQ section that clears up the most common questions. Enjoy the read—and discover the gear that can take your home coffee to the next level!
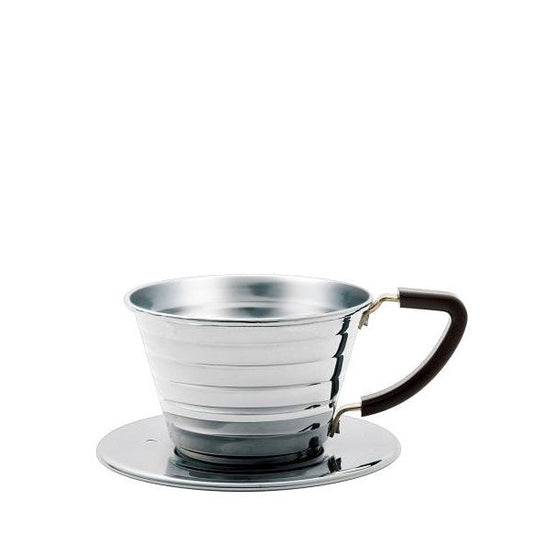
Dripper – pour-over methods
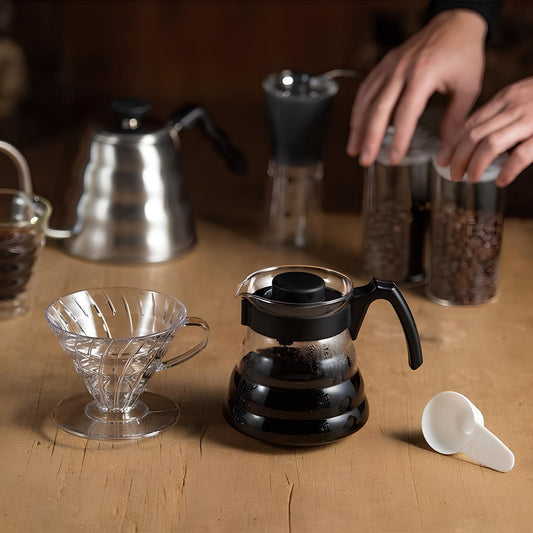
A dripper (often simply called a drip) is a conical or flat pour-over brewer where you place a paper filter and ground coffee. By pouring hot water in a thin stream over the coffee, you get filtered coffee—clear, free of grounds, with a clean taste and complex aroma. The most popular drippers include Hario V60, Kalita Wave, and Chemex (more on it below). Each has a slightly different shape and filter type, which affects the character of the brew.
- Hario V60 – a classic conical dripper with a single opening and spiral ridges inside. The ridges ensure airflow and an even extraction rate. V60 paper filters are thin, so the brew can have a fuller body and slightly more oils in the cup. The V60 comes in sizes for 1–4 cups and in different materials (plastic, ceramic, metal)—ceramic holds brewing temperature longer.
- Kalita Wave – a Japanese dripper with a flat bottom and three small holes. It uses distinctive wave-shaped filters (Wave), which promote even extraction. The brew from a Kalita is similarly clear to a V60, although the flat bottom typically slows brewing slightly and is more forgiving for beginners.
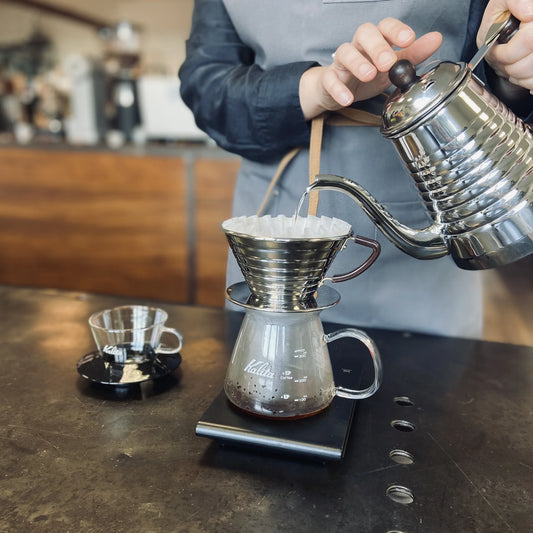
- Other drippers and coffee brewing accessories – Besides V60 and Kalita, you can find dozens of drippers on the market (e.g., Origami, Clever Dripper, Bee House)—each brings something unique. Clever combines a dripper and a French press (immersion brewing with a valve), Origami stands out with beautiful design and filter versatility, etc. Regardless of the model, the principle is similar: freshly ground coffee + filter + controlled pouring. Because this method is highly precise, it’s also worth having a gooseneck kettle and a scale—more on those below.

When is a dripper worth using? If you value clean, clear coffee with complex flavor, a dripper is for you. It’s also a great way to discover subtle differences between single origin specialty beans. Pour-over brewing gives you a lot of control over every parameter (ratios, time, pouring speed), so you can refine your technique like a barista. Drip works best when brewing 1–2 cups at a time, e.g., in the morning with breakfast or for an afternoon coffee for two. For larger batches, Chemex or an automatic drip machine may be a better choice. On our blog you’ll find more tips, including how to choose beans for drip (we recommend lightly roasted single origin coffees with fruity notes). Try brewing this way and you’ll appreciate the ceremony of brewing and the clean taste of your favorite coffee!
Learn more about the history of drip and the secrets of mastering coffee brewing!

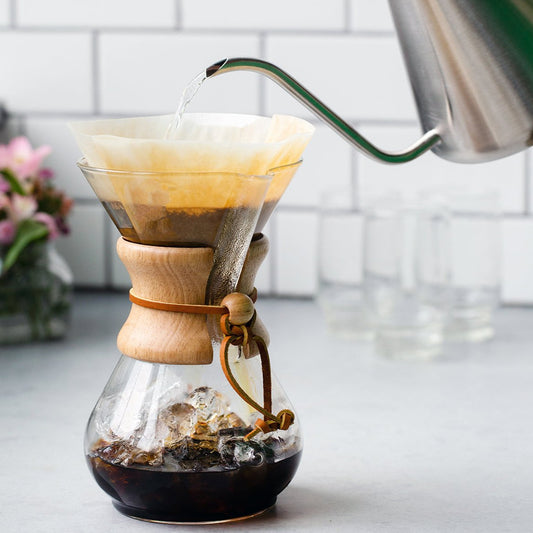
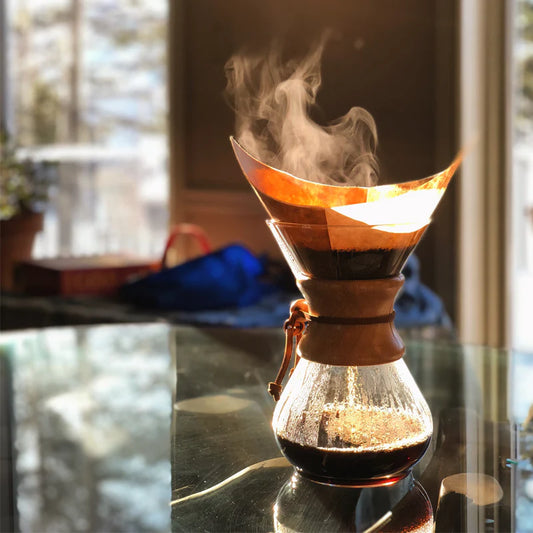
Chemex – an elegant pour-over brewer
Chemex is an iconic pour-over brewer that combines the function of a dripper and a server. It takes the form of an hourglass-shaped glass carafe with a distinctive wooden collar. It’s considered a design icon (featured in the Museum of Modern Art), while also being an exceptionally practical vessel for brewing coffee. In a Chemex, we use special thick paper filters that trap more particles and oils than standard V60 filters. Thanks to this, Chemex coffee is very clear and delicate, with noticeable sweetness and a lighter body. It’s a great method when you want to highlight subtle notes in high-quality beans, for example floral aromas of African arabicas.
Chemex comes in several sizes—from a small one for 3 cups to a large one for 8–10 cups. It lets you conveniently brew coffee for several people at once, which sets it apart from typical drippers placed over a mug. It’s worth remembering, however, that the larger the Chemex and the more coffee you brew, the longer the extraction time—thick filters slow down the flow. Chemex brew time is usually 4–6 minutes, while a single V60 can be brewed in ~3 minutes. That’s why for Chemex we use a slightly coarser grind than for V60, to avoid extending extraction too much.

Why choose a Chemex? If you often brew coffee for several people, or you simply want to enjoy great design, Chemex is a perfect choice. Brewing and serving coffee in a Chemex has a unique charm. The brewer looks elegant on the table, and the glass carafe lets you admire the color of the brew. In terms of flavor, Chemex delivers a slightly cleaner and brighter profile than other pour-over methods—perfect for those who prefer a gentler coffee without bitterness. At JAVA Coffee Roasters you’ll find original Chemex brewers as well as dedicated Chemex filters.
If you’re wondering whether to choose drip or Chemex, check the FAQ – Drip vs Chemex? section, where we compare these methods. Chemex is an investment in quality—both in brewing and in the aesthetic experience.

Cold brew – a pitcher for brewing coffee cold (Cold brew)
For lovers of iced coffee, we recommend getting a dedicated pitcher for brewing cold brew. JAVA’s offer includes, for example, the Hario Mizudashi Cold Brew Pot—a 1-liter glass pitcher with a built-in filter for steeping coffee cold. How does it work? You add coarsely ground coffee to the filter, pour in cold water, and place it in the fridge for 8–24 hours. This slow, cold extraction produces a brew with a completely different character than hot-brewed coffee—exceptionally smooth, low in acidity, with minimal bitterness. Cold brew works perfectly in summer as a refreshing drink—you can serve it with ice, milk, or tonic.
The advantage of having a dedicated pitcher (like Mizudashi) is the convenience and cleanliness of the process. The pitcher has a reusable filter, so once extraction is finished you simply remove it and rinse it. You can store the brew in the same vessel in the fridge and serve directly from it. Mizudashi also has a tight lid, so the coffee in the fridge won’t absorb unwanted odors. Of course, you can prepare cold brew in a jar or a French press as well, but a dedicated vessel makes it much easier.

When should you reach for cold brew? When you want iced coffee with a gentle flavor—perfect both black and with add-ins. Cold brew contains more caffeine and less acidity, so it quenches thirst well and is easier on the stomach. It’s also a great base for drinks (like an iced espresso tonic) or coffee desserts. It’s especially useful in hot weather, but many coffee lovers prepare cold brew year-round to keep a ready coffee concentrate in the fridge. With Mizudashi, you can do it effortlessly—pour water, put it in the fridge and… forget it until the next day, when the coffee is ready. If you want more recipes and variations for cold coffee, visit our blog and learn how to prepare refreshing cold brew at home. Then experiment—cold brew brings lots of fun and caffeinated energy!
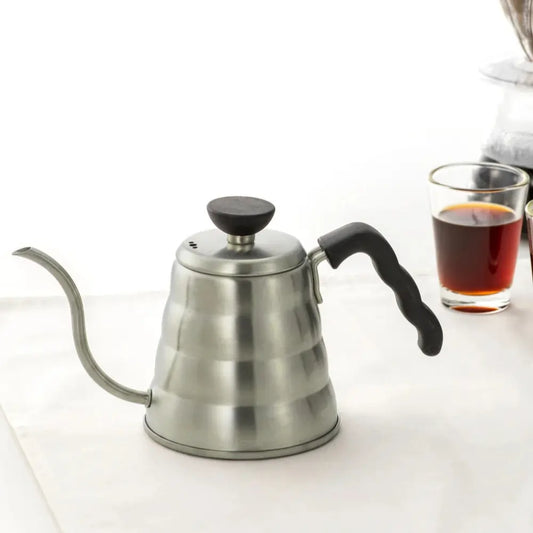
Gooseneck kettle
A precision coffee kettle is a basic tool for fans of pour-over methods. It features a long, narrow spout (a gooseneck) that allows full control over the water stream. Thanks to this, you can pour very slowly in a thin stream and direct it exactly where you want—crucial when brewing drippers, Chemex, or AeroPress. A classic choice is the stainless-steel Hario Buono Kettle. This type of kettle works on any kind of stovetop (gas, induction) and will last for many years. We recommend it both for beginners and advanced coffee lovers.
You’ll also find electric kettles with temperature control on the market. They allow you to set a specific temperature with 1°C precision and hold it—an extra level of comfort and accuracy. Why does temperature matter? Water that’s too cool may not draw out the full flavor (under-extraction), while water that’s too hot can over-extract the coffee (bitterness). The Specialty Coffee Association (SCA) recommends brewing within 90–96°C—a range that supports optimal extraction of aromatic compounds without scorching the coffee. The SCA Golden Cup guidelines specify 93°C ± 3° at the moment water meets coffee. If you don’t have a thermostat kettle or a thermometer, a practical tip is to wait about 30 seconds after boiling—the water should then drop from boiling to ~95°C. It’s also worth preheating the brewer (dripper, Chemex) before brewing, e.g., by pouring boiling water through it while rinsing the filter. This helps prevent an excessive temperature drop during brewing.
When is a specialty kettle useful? For any method that requires precise pouring: drip, Chemex, AeroPress, cupping, etc. If you brew pour-over even a few times a week, investing in a gooseneck kettle is absolutely worth it. You’ll feel the difference in convenience—repeatable results become easier, and extraction becomes more even (no dry coffee left in the filter). Many coffee kettles also have a built-in thermometer or temperature control, which lets you experiment with brew temperature. For example, lighter roasted specialty coffees can sometimes be better brewed with ~94–96°C to bring out sweetness, while darker roasts can be poured with slightly cooler water around ~90°C to limit bitterness. With control over both temperature and flow, you become a true master of the brewing process. That’s why professional baristas rarely part with their gooseneck—and you’ll quickly appreciate this accessory at home too.
Want to try cupping at home? See what it’s all about!

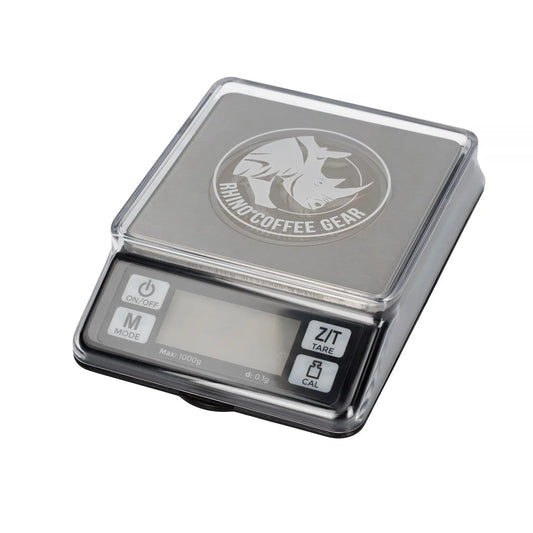
Digital scale with timer
A coffee scale is, in many baristas’ opinion, just as important as a good grinder. It allows you to measure both the coffee dose and the water amount precisely, which is key for maintaining ratios and repeatability. Professional brewing standards (e.g., SCA Golden Cup) recommend a 1:15–1:18 ratio, i.e., about 55 g of coffee per 1000 ml of water—without a scale it’s hard to reach that level of precision. Of course you can use a scoop or a tablespoon, but volume can be misleading: different coffees have different density, and grind size also affects volume. That’s why experts strongly recommend weighing ingredients—mass is always constant, while a teaspoon measure can scoop 5 g or 8 g depending on the coffee. By using a scale, you eliminate guesswork and can accurately repeat successful recipes.
A good coffee scale should weigh with 0.1 g accuracy and have a fast response (readout in a fraction of a second). A useful feature is a built-in timer, so you can track brew time at the same time—many specialty scales even offer automatic timer start when they detect water being poured. Cheaper kitchen scales can still do the job for weighing, but they’re often too slow or switch off automatically during brewing—which can be frustrating. That’s why it’s worth looking for a scale dedicated to coffee.

Why do we need a scale? First and foremost for accurate dosing: it makes it easy to apply optimal ratios (e.g., 18 g coffee / 300 ml water) and achieve repeatable results in the cup. When you find the perfect recipe for a given coffee, you can write it down and reproduce it to the gram and the second—without a scale it’s a lottery. A scale also helps you track extraction progress: you can see how much water you’ve already poured and how much remains, and you can control the pace (ml per second). This is especially important for alternative methods, but also for espresso—baristas weigh both the ground coffee dose and the espresso yield (the brew ratio).
Is a scale essential? Let’s say you can brew good coffee without weighing, but it’s harder to repeat or improve it later. If you want to get the most out of your beans and control flavor consciously, a scale becomes your ally. Anyone who enjoys a more scientific approach to their favorite drink will appreciate it. And if you’re just starting out—a scale helps you avoid basic mistakes (e.g., too much coffee for too little water).
In summary: a scale + timer is a small investment that brings huge benefits. Repeatability, precision, and control—that’s what this unassuming gadget gives you. It’s no coincidence baristas say: “As you brew, so you drink”—and brewing “by eye” makes perfection difficult. Instead, grab a scale, measure your beans and water, start the timer… and your cup will reward you with perfect balance!

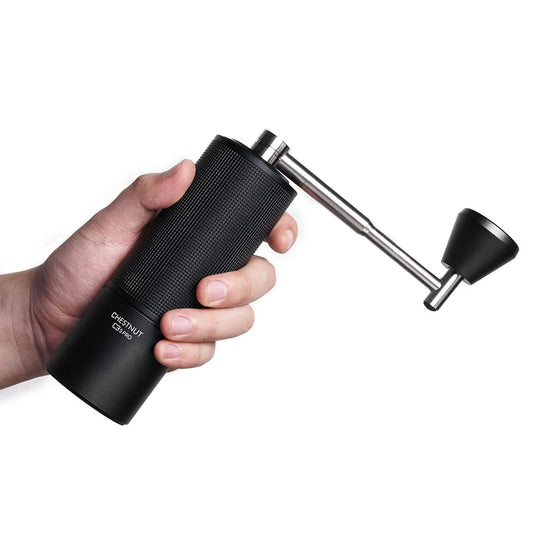
Coffee grinder (manual or electric)
If you use ground coffee—only freshly ground, right before brewing. No accessory impacts flavor as much as a good grinder and high-quality beans. Coffee starts losing aroma just minutes after grinding, as trapped gases and essential oils escape. Grinding drastically increases the surface area exposed to air, accelerating oxidation of aromatic compounds and oils—what takes weeks in whole beans can ruin flavor within a few hours once ground. That’s why the absolute foundation is grinding right before brewing—even the best coffee ground in advance will taste muted, lose subtle notes, and become simply flat.
There are two main grinder types on the market: blade and burr. The difference in grind quality is huge.
- Blade grinders work like a blender—spinning blades chop beans chaotically, producing a mix of dust and uneven particles. This leads to uneven extraction: part of the coffee over-extracts (fine particles), part under-extracts (coarse pieces), resulting in a cup that’s both bitter and watery.
- Burr grinders crush beans between two surfaces, producing uniform particles of almost identical size, which ensures balanced and even extraction across the entire dose. You can taste the difference: burr-ground coffee is fuller, more aromatic, and free from surprises like sudden harsh bitterness or sour thinness. That’s why you should always choose a burr grinder.

Burr grinders come in manual and electric versions.
- Manual grinders are compact, more affordable, and perfect for travel. They do require effort and time—grinding 18 grams of coffee can take about ~1 minute of steady cranking. Good manual grinders use steel or ceramic burrs and allow you to set the desired grind size. A manual grinder is a great starting option if your budget is limited or you enjoy the ritual of hand grinding.
- Electric grinders offer convenience and higher throughput. Good burr models can grind easily even for espresso, with precise grind adjustment. The downside is a higher price and the fact that they take up more counter space.
Why is a good grinder the foundation? Because extraction evenness depends on grind quality—and that translates directly into taste. Fresh and evenly ground coffee releases its full potential: sweetness, floral-fruity notes, clean chocolate bitterness, pleasant acidity—everything in harmony. Coffee ground long ago or unevenly will taste flat and dull—or, on the contrary, both bitter and sour at the same time. The grinder is the heart of a home coffee setup. It’s better to buy a cheaper moka pot or dripper and invest in a better grinder than the other way around. Remember: no espresso machine can fix badly ground coffee. That’s why investing in a good grinder pays off with every cup.
If you want to learn more, we recommend our article: What affects the taste of specialty coffee, as well as How to brew coffee in a moka pot to get the best aroma. And of course, an essential read is the Top 5 coffee ranking for moka pot! In short: grind fresh, use burrs, match the grind to your method—that’s the recipe for success in the coffee world.

Water thermometer (or a temperature-control kettle)
Although many coffee lovers get by without a separate thermometer, it’s worth mentioning it as a useful accessory. A thermometer (analog or digital) lets you accurately measure water temperature just before pouring over coffee. This matters especially in alternative methods and cupping, where stable, correct temperature affects the result in the cup. If you use a standard kettle (without a built-in thermostat), an immersion confectionery thermometer or a dedicated barista thermometer mounted on the kettle can help you hit the recommended 90–96°C range. You can of course wait after boiling—but measuring gives certainty and lets you repeatably target, for example, 92°C or 94°C depending on your needs.
Why bother with temperature? Because different coffees and methods prefer different temperatures.
- Light roasts often show their full flavor at higher temperatures (94–96°C), which helps extract harder-to-dissolve compounds from the dense structure of lightly roasted beans. James Hoffmann famously says about light roasts: the hotter, the better—the hotter the water (within reason), the better sweetness and complexity develop.
- Darker roasts prefer slightly cooler water (90–92°C) to avoid pulling too much bitterness and burnt notes.
- Espresso in pressure machines is usually brewed around ~92–95°C under pressure, but the machine controls temperature here. Still, it’s good to know that many baristas “profile” temperature for a specific coffee. You can learn more in our article: How to brew the perfect espresso.
- Tea (a side topic) also needs temperature control—green tea isn’t brewed with boiling water, but with water around ~70–80°C. With a thermometer or temperature-control kettle, you gain twice—both for coffee and for tea.
If you don’t want to invest in an electric temperature-control kettle but still care about precision, an inexpensive thermometer (even a fast-read meat probe) can solve the problem. Just measure the temperature right after boiling and wait or reheat if needed. Remember that during pouring into a dripper, the water also loses some heat—so it can help to do the pre-infusion (initial wetting of the coffee) with slightly hotter water, as the brewer and grounds absorb a couple of degrees. A thermometer will also help you learn how long your kettle takes to cool to your desired range—for example, that 1 minute after boiling the water is ~94°C. With this knowledge, you’ll gradually start hitting your target temperature intuitively.
In summary, a thermometer is an optional but helpful gadget for curious coffee lovers. We especially recommend it if you experiment with different beans and methods—it will show you how big an impact even a 3°C difference in water temperature can have. This attention to detail is what separates average coffee from outstanding. For those who prefer convenience, an electric kettle with temperature settings combines the kettle and thermometer in one. Choose what fits your brewing style.

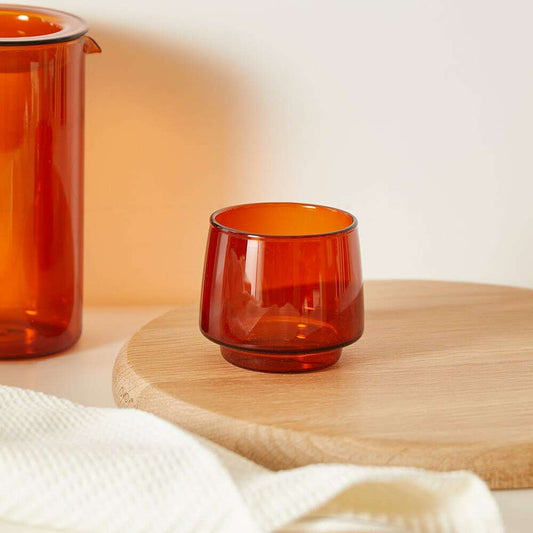
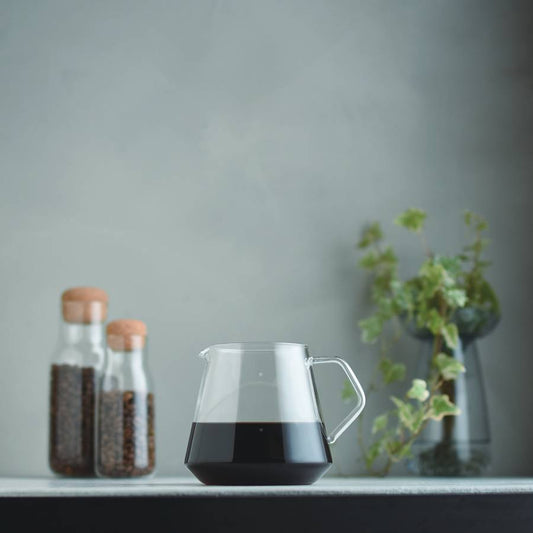
Coffee server (carafe)
A server is simply a glass carafe for brewed coffee. It’s mainly used with pour-over methods—placed under a dripper (instead of a single mug), or used to decant coffee from a Chemex or French press to better manage serving. Coffee servers are made of heat-resistant glass that can handle temperature changes—so they won’t crack when in contact with hot coffee. They usually hold 300–600 ml (2–5 cups) and come with a comfortable handle and a lid to help retain heat.
Why is a server worth using?
- First, it allows you to brew a larger amount at once and pour it evenly into several cups. When you brew drip directly into a mug, you can typically make at most 1–2 portions. A server gives you flexibility—you can brew 500 ml and pour equally for guests, or even serve coffee like tea, from a carafe.
- Second, a server often has a measuring scale, which helps estimate brew volume.
- Third, aesthetics—a glass carafe full of aromatic coffee looks inviting and lets you enjoy the color of the brew.
Servers are especially useful in cafés and cuppings, but they’re also worth having at home if you brew for a few people or want to decant coffee from a French press (to stop extraction—coffee shouldn’t sit on the grounds for long). Some people also use a server as a vessel for chilling coffee—for example, in Japanese Iced Coffee you brew directly over ice placed in the server. The versatility is huge.

In JAVA Coffee Roasters’ offer, you’ll find servers known for minimalist, stylish design and high durability.
In short, a server is a simple, affordable gadget that elevates the culture of serving coffee. It’s useful when you host friends for drip coffee, but also day to day—for example, when brewing a larger Chemex, it can be more convenient to decant into a smaller server and top up your cup gradually (the lid helps the coffee stay warm longer). If you don’t have one yet—consider adding a carafe to your coffee arsenal. A small thing, but a joy!

Espresso diffuser (puck screen / shower screen)
A diffuser in the coffee context most often refers to a part of an espresso machine responsible for distributing water evenly over the coffee. Every portafilter machine has a so-called shower screen (a metal screen with outlets) in the group head, which acts like a diffuser—spreading the hot water stream across the entire surface of the tamped puck and ensuring even espresso extraction. Regular maintenance and replacement of this part is important to maintain extraction quality in the machine. However, more recently, home baristas have also been using additional diffusers in the form of small screens placed on top of the coffee puck in the portafilter before brewing.
This gadget is often called a puck screen. It’s a thin steel disc screen that you place on the tamped coffee in the portafilter before starting extraction. Its job is to further disperse the water flow and prevent so-called channeling (water breaking through in one spot). With the diffuser, water presses evenly from above, which translates into more stable extraction, higher repeatability, and better espresso taste—less bitterness from over-extraction and more sweetness. An added benefit is protection against mess (the puck screen catches fine coffee particles that would otherwise stick to the machine’s shower screen). After brewing, you simply remove it and rinse under water.
Diffusers/puck screens come in different diameters matched to basket size. They’re made of stainless steel with precisely etched micro-holes (e.g., 150 μm) that disperse water and filter fine particles. Using a puck screen is simple: place it on the tamped coffee in the portafilter and lock the portafilter in as usual. You just need to remember to match your dose—because the screen takes up space in the basket, you may sometimes dose 0.5–1 g less coffee to make room.
Is a diffuser worth using? If you’re an espresso nerd aiming for maximum shot repeatability—definitely yes. It’s an accessory highly praised by baristas for improving extraction uniformity (less channeling) and producing a cleaner taste in the cup. You could say a puck screen calms the water flow—coffee brews as if it had an extra shower from above. For owners of more affordable machines, it’s a way to get closer to the extraction quality of more expensive models (which often have better water distribution). The cost of such a screen isn’t high, and the results can be pleasantly surprising. Still, it won’t perform miracles—if the puck is tamped poorly or the grinder produces an uneven grind, the diffuser alone won’t fix everything. It’s the final polish in the pursuit of espresso perfection.
In summary: a diffuser/puck screen is an advanced accessory for those who want to get the most out of their espresso machine. It’s not mandatory, but it can improve extraction and make keeping the machine clean easier. If this sounds intriguing—try it, and you might never go back to brewing without this little disc.
French Press – plunger brewer
French Press (a plunger brewer) is one of the simplest ways to brew coffee at home: add coffee, pour in water, wait, then separate the grounds using a plunger with a metal filter. It’s immersion brewing (coffee steeps in water), so the brew typically has a fuller body, more oils, and a creamier texture than pour-over methods. A French Press makes it easy to brew coffee for 1–2 people—or a larger batch—without complex pouring technique.

How to brew coffee in a French Press (a simple starter recipe)
- Grind: choose a coarser grind than for drip, similar to coarse salt / breadcrumbs. Too fine a grind more often leads to bitterness and sediment in the cup.
- Ratio: start with about 60 g of coffee per 1 liter of water (i.e., 18 g per 300 ml) and adjust to your taste.
Water temperature: most often 90–96°C works best (in practice: shortly after boiling).
Time: pour water over the coffee, gently stir, cover, and brew for about 4 minutes. - Plunge: press slowly and evenly—no jerking. After brewing, it’s best to pour the coffee into cups or a server right away so it doesn’t sit on the grounds (this reduces over-extraction and unpleasant bitterness).
When is a French Press a good choice? If you like coffee with a more intense character and want convenience. It’s also a good method when testing new beans—quickly reveals flavor with fewer variables. Plus, you can also make simple cold brew in a French Press (coarsely ground coffee + cold water, placed in the fridge), then separate the grounds with the plunger.
Remember: French Press loves cleanliness—after each use, disassemble the filter, rinse the parts, and from time to time wash more thoroughly (oil residue can affect the taste of future brews).

Why invest in good accessories?
To sum up our overview: high-quality coffee accessories aren’t just gadgets—they’re real tools that improve brewing comfort and the taste of your coffee. They provide:
- repeatability (scale, grinder),
- precision (kettle, thermometer),
- clean taste (filters, drippers, servers), and
- an expert finishing touch (diffusers, specialty brewers).
Thanks to them, we can brew coffee according to best practices recommended by SCA experts and experienced baristas—at home, every day. It’s fascinating how a small change can take our coffee to the next level. Of course, gear won’t replace good coffee—the foundation will always be freshly roasted beans of high quality (ideally Specialty). But combining great beans with the right accessories creates synergy: you can brew an excellent cup where nothing is accidental.
At JAVA Coffee Roasters, we want customers to be able to fully equip themselves for coffee brewing. That’s why our shop offers a wide range of accessories: from drippers, Chemex, and AeroPress, through filters, grinders, scales, kettles, to vacuum containers and thermal mugs. We focus on products from trusted brands as well as our own JAVA accessories, combining functionality with unique style. Importantly, we also provide expert advice—if you’re not sure which grinder or brewer to choose, contact us (e.g., via our contact form or social media). We’ll gladly share knowledge and help you choose gear suited to your preferences.
We also encourage you to explore the JAVA Coffee Roasters blog—we regularly publish guides, rankings, and coffee curiosities. It’s a treasure trove of practical information.

Finally—remember that coffee is a journey, not a destination. A complete set of accessories lets you get even more joy from that journey. Whether you’re a sleepy morning fan of a quick drip, or you prefer afternoon experimenting with AeroPress—the right gear will make every cup a small celebration. Visit our coffee brewing accessories category and treat yourself to excellent specialty coffee beans from JAVA Coffee Roasters. We wish you successful experiments and many delicious coffees! ☕️❤️
Frequently asked questions about coffee accessories (FAQ)
Do I really need a coffee scale?
A good scale makes life much easier. It lets you precisely measure coffee-to-water ratios, which translates into a repeatable taste. SCA experts recommend using a scale for consistency—beans have different density and volume scoops are imprecise. Of course, if you brew occasionally and you’re happy with “a teaspoon per cup,” it’s not a sin. But especially for alternative methods and espresso (where even 1 gram makes a difference), a scale becomes essential.
Drip vs Chemex – what’s the difference?
Drip and Chemex are both pour-over methods, but they differ in construction and characteristics. Chemex is a one-piece glass brewer with a very thick filter—this makes the coffee cleaner and more delicate, with a lighter body (thick paper traps more oils and particles). Chemex also has a larger capacity—you can brew 6–8 cups at once and use it as an elegant carafe. Drip is just the cone you place on a mug or server. Filters are thinner, so the coffee comes out a bit fuller with slightly more oils (still clear, but a bit heavier than Chemex). V60 typically brews 1–2 cups at a time, though you can also place it on a larger carafe. Technique differs too—because of the thick filter, Chemex brews longer (4–5 minutes for 500 ml), while V60 is faster (~3 minutes for 300 ml).
How should I care for coffee accessories?
Most glass and steel accessories (drippers, servers, Chemex, pitchers, measuring tools) can be washed with warm water and dish soap. Paper filters are single-use—discard after brewing (they’re biodegradable). Grinders need cleaning from coffee residue—every few uses, it’s worth disassembling and removing old oils and grounds (there are special brushes, and occasionally you can run grinder cleaning tablets or rice through the grinder—carefully). Protect electronic scales from spills. Descale kettles (vinegar, citric acid) every few months. Espresso machines (if you have one) have full cleaning rituals—from backflushing the group, descaling, to cleaning the grinder and steam wand. Storage matters too: handle glass accessories carefully, keep paper filters dry, and don’t leave beans sitting in the grinder hopper too long (oils can go stale and dirty it). Overall, coffee accessories are fairly easy to maintain—unlike espresso machines, which demand more attention. Most of these tools will last for years with minimal effort.
What single purchase will improve my coffee the most?
If we had to pick one: a burr grinder! Fresh, properly ground beans are the foundation of great coffee. Even brewed in a simple way (e.g., steeped in a cup, Turkish-style), freshly ground coffee will be far better than coffee ground a week ago. Of course, that assumes you’re already using decent whole-bean coffee—bean quality and grinding go hand in hand. The second “game changer” is a scale—it helps eliminate ratio errors and reproduce the perfect recipe. But if you already use precise methods (like moka pot or drip) and your grinder is poor—upgrading the grinder will have a bigger flavor impact. Remember that water matters a lot too—it’s often overlooked. If your tap water is very hard, consider a water filter or mixing demineralized water with mineral water to reach an optimal mineral content of about 100–150 ppm. Sometimes improving water and grinding changes coffee more than switching the brewer.
Have more questions? Message us or visit our blog—we’re continually expanding our FAQ and guides to support the coffee community. There are no silly questions when it comes to coffee—everyone started from zero once, and we’re happy to share our experience so you can enjoy your best cup every day 😊.

![CHEMEX szklany zaparzacz do kawy Seria Six Cup Classic [6 FILIŻANEK]](http://javacoffee.pl/cdn/shop/products/chemex-classic-6cup.png?v=1711547293&width=533)